Creating your first Jenkins job
- Rebecca Boardman

- Nov 30, 2020
- 3 min read
following on from my last post we successfully installed Jenkins. If you haven't got Jenkins installed yet on your own machine I'd recommend you follow my previous blog post which you can find here
Now we'll have a basic look into creating our very first job and how to trigger the job to run remotely. So first things first- sign into jenkins with the account you set up previously. You'll then be brought to the home page.
Basic job creation
1.) Click on create your first job

2.) Enter your job name- in this example we'll call the job name "Current-time-example" and select freestyle project

3.) Scroll down to build- this controls your build steps. Under add build step select 'Execute Shell'

4.) Paste in the following code:
echo "Hello on machine $(hostname) the date is currently $(date)"it should look like the below:

5.) Click Save. Which will bring you to the job page. You can now click the "Build now" option which will execute your job

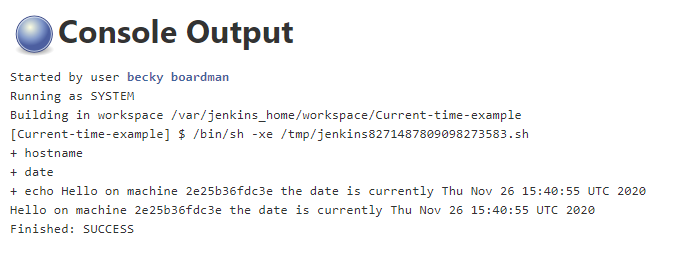
6.) You'll then see an entry under build history #1 (build number 1). When you hover over the number you should see an arrow "v" and select console output

7.) This shows you the status of the job (the blue circle means success). As you can see it will tell you who started the job, what account the job ran under, ad show the output of our script and the fact it finished successfully.
Triggering the job remotely
So we have our job working but what if we don't want to manually always go to the jenkins UI and trigger the job. Is there a way to trigger the job remotely by running 1 command? Yes absolutely!
1.) Select back to project which will take you back to the job screen where we can amend the configuration of the job

2.) Select configure and under build triggers select trigger builds remotely. You can now add in an authentication token. This can be anything you like. In this example we'll keep it simple and just type the following "1234". Copy the below highlighted in grey to a note pad as we'll come back to this later.
3.) Click save
4.) Open note pad which you used to paste in the URL in step 2 as we'll need to make some amendments
As advised use the following URL to trigger build remotely:
JENKINS_URL/job/Current-time-example/build?token=TOKEN_NAMESo if I amend this for my local machine (please note you can also reference the IP address if calling from other servers):
localhost:8080/job/Current-time-example/build?token=12345.) Paste your URL into a new tab within Chrome/Internet explorer. This will trigger the job to run.
6.) Refresh on the job page and you'll now notice that there is another build #2 within the build history which shows the job executed successfully!

1.) Lets create another job- go back to the jenkins dashboard and select new item

2.) Enter a job name eg "Trigger-Demo" and select freestyleProject and click ok

3.) Scroll down to build- this controls your build steps. Under add build step select 'Execute Shell'
4.) Paste in the following code:
echo "Hello world"5.) Under Build Trigger select "Build after other projects are built" and under projects to watch Type in the previous project you set up eg "Current-time-example".

6.) Click save and select "Back to Dashboard". You'll notice while current-time-example has previously run out new job "Trigger-Demo" has not yet run.

7.) Because we've selected our "Trigger Demo" job to build after the "Current-time-example" job has been built we'll need to trigger the "Current-time-example" which should then in turn run our new job. You can trigger it manually through the UI or trigger it remotely (see above)
8.) If you refresh the dashboard you'll see that our job "Trigger Demo" has now successfully run.

To Sum up the above: We have created our first ever jenkins job, set up a job to be called remotely and also set up a job to execute after another job has been built!

Comments